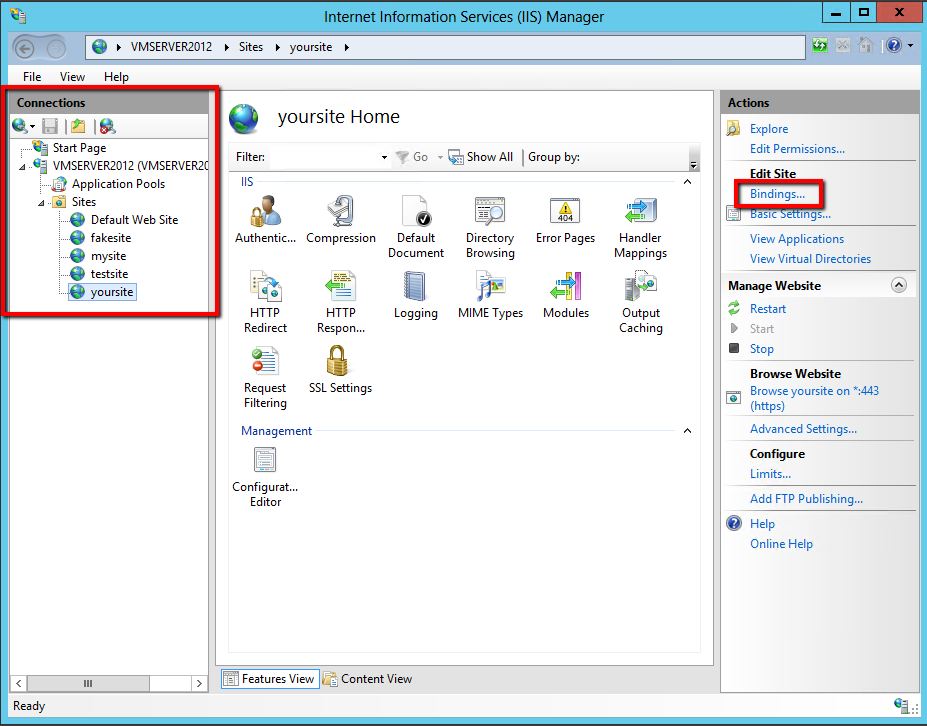
Free 24 Hour Customer Support. Operational effectivity, enhancement of customer experience, generating new income opportunities, and then lastly business agility. Organizations that deliver a incredible customer experience accomplish that as a result of they'll focusing their core competencies so as to keep up the service ranges they know their clients deserve. Using the hash value of a Code Signing Certificate is one other method to let signtool know which Code Signing Certificate to make use of. For extra info, check with the Windows Enforcement of Authenticode Code Signing and Timestamping page. In case you have a couple of Code Signing Certificate on your pc, we recommend that you simply manually select which certificate to use for signing code. Within the DigiCert Certificate Utility for Windows©, click Code Signing (blue and silver shield). After DigiCert validates your order and points your SSL certificate, you need to use the DigiCert Certificate Utility to put in the certificate file to your Windows Server 2012. Then you need to use IIS eight or IIS 8.5 to configure the server to use it.
1. Download and open the ZIP file containing your certificate. 1. Open a command immediate as an administrator. After your token and pc are ready, use the SignTool command to signal your program. If you have a number of certificates put in in your Personal Certificate retailer, it may be higher to make use of the /sha1 choice to specify the hash worth of the Code Signing Certificate instead of using /a or /n "topic identify" within the signing command. Install your EV Code Signing Certificate in your token before proceeding with these instructions. To view these directions in Spanish, see CSR para Tomcat and Tomcat Instalar Certificado SSL. Next, use Microsoft Management Console (MMVC) to export the SSL Certificate as a .pfx after which import the SSL Certificate .pfx file in to the Ad FS Personal Store. 1. Import the .pfx file to your Exchange 2007 server utilizing the DigiCert Certificate. 1. With the DigiCert Certificate Utility, import your certificate .pfx file to your Exchange 2013 server. 7. Click Finish to import the SSL Certificate (.pfx file) to your Exchange 2013 server. Click Finish to generate the CSR. Note: If you're making a csr for a wildcard certificate, skip this step by clicking Next and Next.
Note: In case your aren't making a csr for a wildcard certificate, click on Next. If you’ve ever tried to run an HTTPS site locally, you’ve probably seen something like the following in Chrome: The workaround used to be making a self-signed certificate and utilizing that. Note: With Secure Site Pro you get priority validation and precedence help. Note: Select a location that you would be able to entry. You could have the ability to entry the situation so that you need to use the CSR to order your SSL certificate. 3. Access the Exchange Admin Center (EAC) by opening a browser and searching to the URL of your server (e.g., https://localhost/ecp). 9. On the Certificates page, in the center pane, select the SSL certificate you just put in and then click on ✏ (pencil). 4. On the Exchange Admin Center credentials page, enter your Domain/consumer name and Password and then click sign up. 6. On the Certificates web page, in the middle pane, choose your certificate request after which within the certificate request particulars pane to the appropriate, beneath Status, click on the complete link. See Exchange 2013: Assign the Certificate with Exchange Admin Center. The wizard populates the listing with domains that Exchange 2016 recommend you embody in your certificate request.
8. The certificate must be successfully installed in your Exchange 2016 server, and the standing of your certificate request should now be Valid. Now that we've the Signed certificate we are finished with the ADCS net page, and you'll shut your browser. 5. Within the EAC, within the sidebar menu on the left, click on Servers after which within the menu at the top of the page, click on Certificates. NetScaler Gateway Virtual Servers page, choose the digital server to which you need to bind your certificate after which click on Open. 12. Your SSL certificate should now be enabled for the services you chose in your Exchange 2016 server. After we validate and situation your SSL certificate, you want to install it on the Windows Exchange Server 2016 the place the CSR was generated. Exchange 2016 server's network share folder (where you saved the CSR). If you haven't but created a CSR and ordered your certificate, see Exchange 2016: How one can Create Your CSR.